|
The new MasterBorder that we created in the previous section of this tutorial will work on all web pages EXCEPT for the home page.
This is because NOF publishes the home page one level above the other HTML pages (when publishing by asset type).
Fortunately since we have already created our new MasterBorder to be used on all other web pages, NOF makes it easy for us to copy that MasterBorder and make our subtle changes to the file locations.
Update: 3-30-2006
In NetObjects Fusion Version 9 it appears that the HTML generation has finally been fixed so that images on the home page no longer require a different path to the ../assets/images folder.
This means that NOF Version 9 users can skip this step of the tutorial.
Update: 5-30-2008
In NetObjects Fusion Version 10 and 11 it appears that the HTML generation has been regressed so that images on the home page still require a different path to the ../assets/images folder.
This means that NOF Version 10 and 11 users should NOT skip this step of the tutorial.
“Cloning” the MasterBorder.
Select the Home Page from the site navigation and change to it in Page Design view.
Press F10 to bring up the MasterBorder Properties screen.
Click the Add/Edit button and then Add to create a new MasterBorder.
Type in the name for the new border and base it on the name you used to create the other new MasterBorder.
In our example - our other MasterBorder was called FBlue so we will call this new border HomeFblue.
When you are finished the MasterBorder Properties for the home page should look like this:
Modifying the path to the image slices for the Home Page
The final part of this tutorial is to modify the path to the EZRound image slices for the HTML in the Home Page MasterBorder.
Since we “cloned” our MasterBorder from the one that already has the EZRound design in place, this is fast and easy.
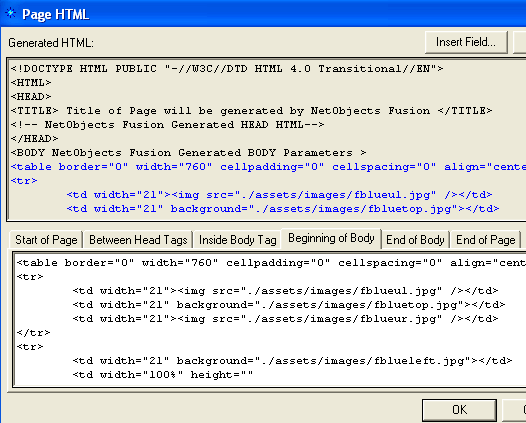
Press F10 to open the MasterBorder Property window, then click the HTML button. Next click the Beginning of Body tab.
Remove ONE DOT from the ../assets/images part of all five file paths
To clarify:
You are changing ../assets/images to ./assets/images
Do NOT change anything else.
When done your screen should look like this:

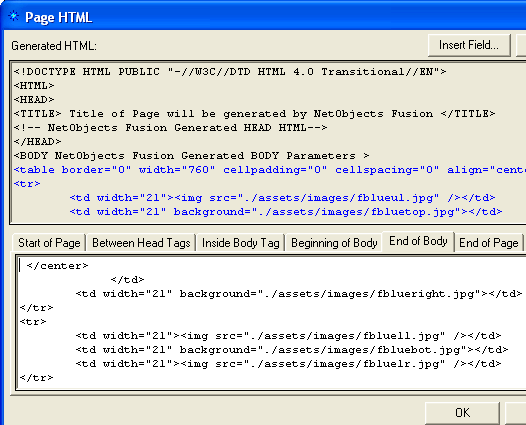
Click the End of Body tab and repeat the process for the other four images.
When done your screen should look like this:

If you want to have a different background color, repeating background image or EZRound design for any particular web page you would simply repeat this process and create a new MasterBorder with unique values for that page.
Click here if you want to see specific instructions on how to use a different background color behind the EZRound design.
Click here if you want to see specific instructions on how to use a repeating background image (wallpaper) behind the EZRound design.
Congratulations!
That completes your tutorial.
|


